
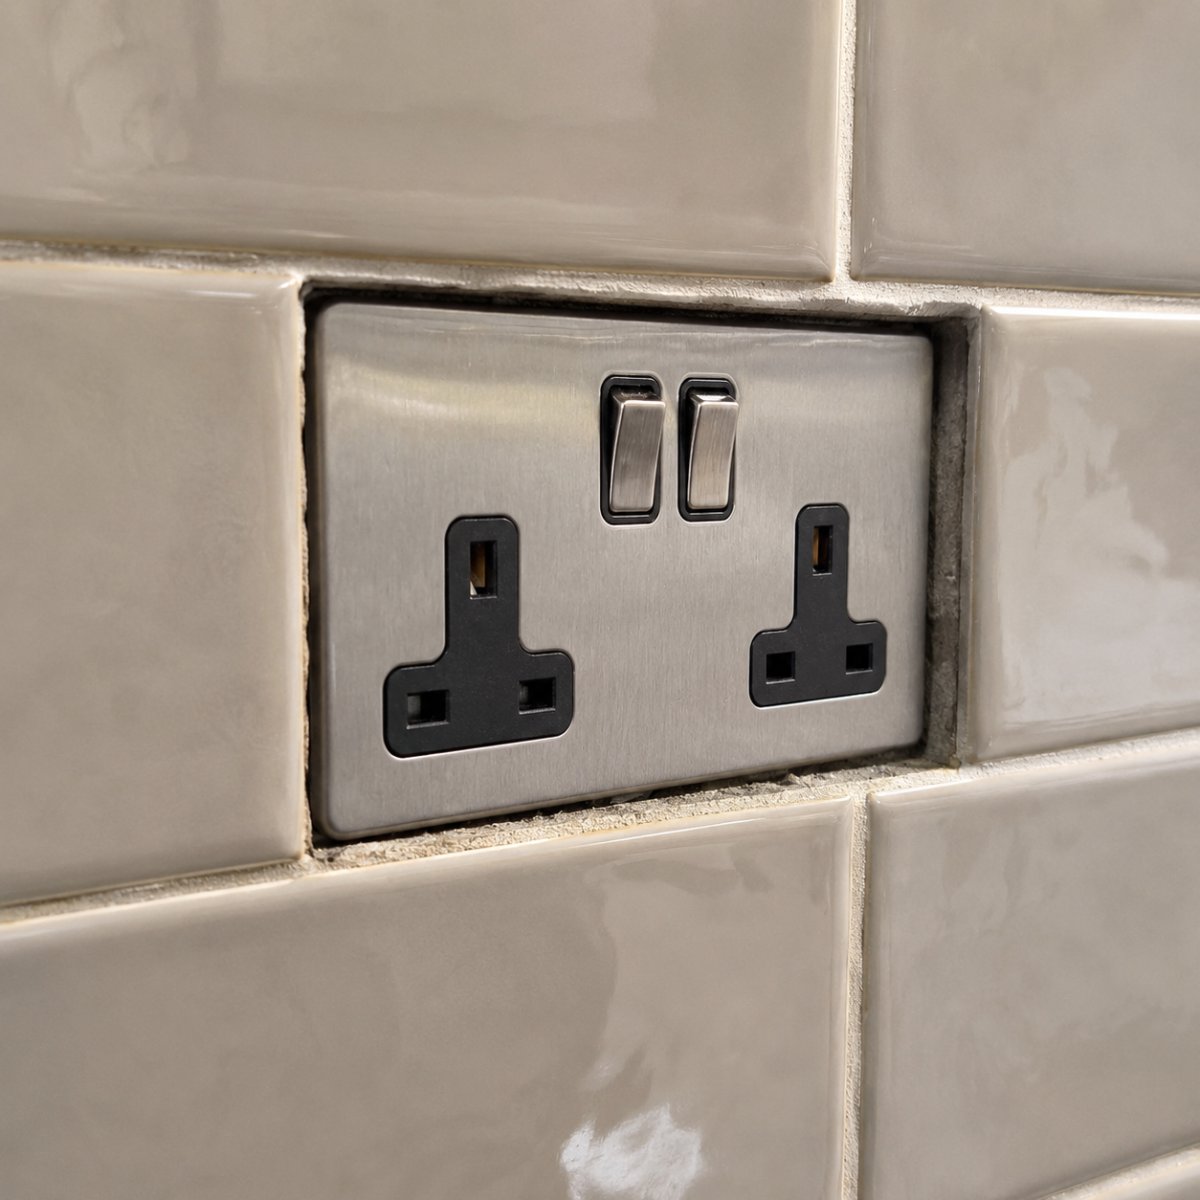
After completing a home renovation project like tiling a kitchen or adding decorative panelling, you step back to admire your work. But then you notice it: the electrical sockets and switches are no longer flush with the wall. They are sunken, recessed into the new surface, making it impossible to fit the faceplate correctly. This common issue not only looks unprofessional but can also create significant safety hazards.
This guide explains how to extend a socket back box correctly and safely. We will explore why this problem occurs, detail the risks of improper fixes, and provide a step-by-step process for achieving a secure, professional finish. Forget temporary hacks; learn the right way to bridge the gap using our Build My Spacer tool and ensure your electrical fittings are both beautiful and compliant.
Table of Contents
Understanding the Recessed Back Box Problem
A recessed or sunken back box is an electrical enclosure that sits too deep inside a wall cavity to allow the socket or switch faceplate to be fitted flush against the finished wall surface. This issue frequently arises during home improvements when a new layer of material is added to the wall, increasing its overall thickness.
-
Common Scenarios: The problem is most often encountered after kitchen or bathroom tiling, installing decorative MDF or wooden wall panelling, or applying a thick new layer of plaster, particularly in older properties.
-
How to Identify a Recessed Box: The most obvious sign is when the standard screws supplied with your socket or switch are too short to reach the threaded lugs inside the back box. The faceplate will not sit flat, or it will be impossible to attach at all.
-
Surface-Mounted vs Flush-Fitted Boxes: It is important to distinguish between a surface-mounted box (often called a pattress box), which sits on top of the wall, and a flush-fitted back box, which is installed inside the wall cavity. This guide focuses exclusively on extending flush-fitted metal or plastic back boxes.
Why Sockets Become Sunken After Redecorating
The core of the problem is a change in the distance between the front edge of the back box and the final wall surface. Even a few millimetres can make a standard installation impossible.
-
Impact of Tiling: Modern wall tiles are often 8mm to 10mm thick. When you add a 2mm to 4mm layer of tile adhesive, the wall surface can be brought forward by up to 14mm, leaving the back box far behind.
-
Decorative Wall Panelling: MDF panelling, a popular design choice, can add anywhere from 6mm to 18mm to the wall's thickness. This creates a substantial gap that standard electrical screws cannot bridge. For more detailed guidance on this, see our article on choosing a socket spacer for panelled walls.
-
Multi-Layered Plasterwork: In older UK homes, walls may have been replastered multiple times. Skimming over old plaster or using dot-and-dab plasterboard can easily add 10mm or more, creating a recessed box issue.
Identifying the Gap Depth
Before you can choose a solution, you must accurately assess the scale of the problem. A small gap might seem trivial, but it is the primary indicator of an improper and potentially unsafe fitting.
-
Visual Signs: If you try to fit the faceplate, you will see a visible gap between the back of the plate and the finished wall. The plate may wobble or feel loose even if you can get the screws to bite.
-
Why Standard Screws Fail: Socket and switch faceplates are typically supplied with 25mm or 35mm M3.5 screws. These are designed for back boxes that sit just millimetres behind the final surface. If your new wall surface has added 10mm of depth, these screws will not be long enough to securely engage the threads in the back box lugs.
-
Initial Assessment: Determine if you need a minor adjustment or a full extension. If the gap is more than a couple of millimetres, simply using longer screws is not enough. You need a solution that provides structural support and maintains the electrical enclosure.
The Hidden Dangers of a Floating Socket
When faced with a recessed back box, many people resort to a seemingly simple fix: using extra-long screws to pull the faceplate onto the wall, leaving a hollow gap behind it. This creates what is known as a "floating socket", an installation that is structurally unsound and electrically non-compliant.
-
Defining the Floating Socket: A floating socket is a faceplate held in place only by the tension of its screws. There is no solid support behind it connecting it to the back box.
-
Mechanical Stress: Every time a plug is inserted or removed, significant force is applied to the faceplate. Without proper support, this stress is transferred directly to the screws, the screw lugs in the back box, and the surrounding wall surface.
-
Fire Safety Risks: UK wiring regulations (BS 7671) require that all electrical connections are contained within a suitable enclosure. A floating socket breaks this enclosure, creating a potential fire hazard.
Structural Instability and Wall Damage
A floating socket is an accident waiting to happen. The lack of rear support creates constant movement, which will inevitably lead to physical damage.
-
Cracked Tiles and Plaster: The force of plugging and unplugging a device will cause the faceplate to flex and press against the wall. On a tiled surface, this repeated pressure can easily cause hairline cracks to form around the socket cutout. In plastered walls, it can lead to crumbling and chipping.
-
Risk of Snapping Faceplates: Modern faceplates, especially those made from brittle thermoset plastic, are not designed to withstand flexing. A poorly supported socket can easily crack or snap when a stiff plug is pushed in.
-
Long-Term Damage: Over time, the constant movement can bend the screws or even break the threaded lugs off the back box, making a secure repair impossible without replacing the entire box.
Electrical Integrity and Enclosure Safety
The most serious risks associated with a floating socket are electrical. The back box and its extension form a critical safety barrier that must not be compromised.
-
Protecting Cables: The gap behind a floating socket can expose the insulated cables to the wall cavity. If the insulation is damaged during installation, it could come into contact with flammable materials like timber studs or insulation.
-
Containing Electrical Arcs: A primary function of a back box is to contain any potential electrical arcing that might occur from a loose connection. If a fault occurs, the enclosure prevents sparks from igniting surrounding materials. A gap breaks this containment.
-
Maintaining Enclosure Integrity: A socket spacer or extension collar is designed to form a continuous, solid-sided extension of the back box. This maintains the integrity of the protective enclosure, ensuring that all terminals and connections are safely housed as required by regulations. Simply using long screws offers no such protection.
Evaluating Your Options: Extension Collars vs Longer Screws
Once you have identified a recessed back box, you need to choose the right method to extend it. The options range from unsafe DIY hacks to professional, compliant solutions. It is vital to understand the difference.
-
DIY Fixes vs Professional Solutions: Temporary fixes like using washers or nuts as shims are not compliant with wiring regulations because they do not create a solid-sided enclosure. A professional solution must provide both structural support and electrical containment.
-
Limitations of Standard Extension Frames: Many large DIY retailers sell standard plastic extension frames. However, these are typically only available in one or two depths, most commonly 32mm, which is often far too deep for modern tiling or panelling projects.
-
Why Longer Screws Are Not a Solution: As detailed above, using longer screws alone creates a dangerous "floating socket". This approach should be avoided for any gap greater than 1-2mm.
-
Introduction to Bespoke Spacers: The ideal solution is a spacer that is manufactured to the exact depth you need. Bespoke spacers bridge the gap between inadequate DIY hacks and ill-fitting, off-the-shelf products.
The Problem with Standard Extension Frames
While a standard extension frame is better than no extension at all, these mass-produced products have significant drawbacks that make them unsuitable for a high-quality finish.
-
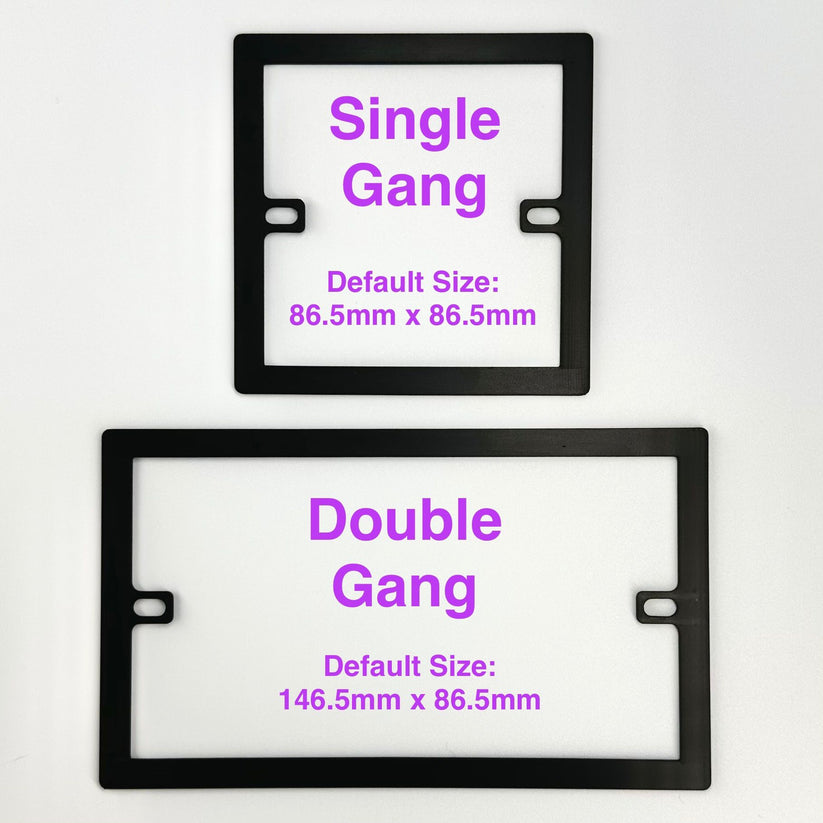
Incorrect Depths: The most common depth available is 32mm, designed for extending a 16mm box to a 47mm depth. This is rarely the size needed for a 10mm tile gap. Using a frame that is too deep creates a new problem: the socket now protrudes from the wall.
-
Limited Configurations: It can be very difficult to find extension frames for anything other than a standard single or double gang socket. Multi-gang switches or non-standard fittings are not catered for.
-
Aesthetic Issues: Standard frames are often bulky and made from cheap-looking plastic. They create a visible, chunky surround that can ruin the aesthetic of a premium finish, especially with decorative sockets or switches.
When Longer Screws Are (and Are Not) Sufficient
There is a common misconception that longer screws are a valid way to extend a socket back box. This is incorrect and unsafe in almost all circumstances.
-
Maximum Safe Extension: Without any additional support, a faceplate should not be spaced more than 1mm or 2mm from the back box. Any further, and the structural integrity is compromised.
-
Increased Leverage and Risk: The longer the screws, the more leverage is applied to the back box lugs when a plug is used. This flexing can easily bend the lugs, damage the threads, or even pull the back box loose within the wall.
-
The Mandatory Point for a Spacer: If you cannot achieve a rigid, flush fit with the screws supplied with the socket, a physical spacer is mandatory for a safe and compliant installation. This ensures the faceplate is fully supported from behind. For a more detailed comparison, explore our guide on professional spacers versus DIY shims.
Step-by-Step: How to Measure and Fit a Socket Spacer
Fitting a socket spacer is a straightforward task that any competent DIYer can perform. The key to a perfect result lies in accurate measurement and following a safe installation process.
Safety First: Before starting any electrical work, you must isolate the circuit you are working on. Go to your consumer unit (fuse box) and switch off the relevant circuit breaker. Use a voltage tester to confirm there is no power at the socket before proceeding.
-
Isolate the power and verify it is off.
-
Unscrew and gently pull the existing socket faceplate away from the wall.
-
Measure the precise depth required for the spacer.
-
Order a bespoke spacer or purchase an appropriate extension.
-
Fit the spacer over the back box and secure the faceplate.
Measuring for a Perfect Fit
Accurate measurement is the most critical step. An incorrect measurement will result in a spacer that is too short or too long, defeating the purpose of a custom solution.
-
How to Measure: Use a good quality ruler or a digital depth gauge. Measure the distance from the front face of the threaded lug on the back box to the front face of your finished wall (e.g., the front of the tile or panelling).
-
Account for Uneven Walls: Tiled or plastered surfaces are not always perfectly flat. Measure the depth at both the top and bottom screw holes. If there is a difference, use the larger of the two measurements to ensure the faceplate does not get crushed against a high spot.
-
Use a Configuration Tool: For guaranteed accuracy, you can input your precise measurements into an online tool. Our Build My Spacer tool allows you to specify the exact depth in millimetres for a perfect, custom-manufactured fit.
Installation and Final Alignment
Once you have your correctly sized spacer, the final installation is simple. You will need longer M3.5 electrical screws that are equal to the standard screw length plus the depth of your spacer.
-
Position the Spacer: Place the spacer over the front of the back box, ensuring the screw holes on the spacer align perfectly with the threaded lugs on the box.
-
Feed Wiring Through: Gently guide the existing wiring and the socket accessory through the central aperture of the spacer frame.
-
Secure the Faceplate: Position the faceplate over the spacer and insert the new, longer screws. Tighten the screws evenly, alternating between the top and bottom, until the faceplate is held firmly and sits perfectly flush against the wall. Do not overtighten, as this can crack the faceplate.
Achieving a Professional Result with Bespoke Extension Frames
For a truly flawless and safe finish, a bespoke, custom-manufactured spacer is the ultimate solution. Unlike off-the-shelf products, a made-to-order frame solves the exact problem you have, with no compromises on fit, appearance, or safety.
-
Precision for Unique Needs: Custom spacers are ideal for high-end projects where aesthetics are paramount and standard solutions will not suffice.
-
Solving Non-Standard Depths: Whether you need a slim 3mm spacer for a plaster skim or a deep 30mm extension for thick stone cladding, a bespoke service can manufacture it to the exact millimetre.
-
Addressing Multi-Gang Configurations: Standard extension collars are rarely available for triple-gang switches or custom media plates. A bespoke frame can be made for any configuration, ensuring all your fittings match.
-
The Professional's Choice: Electricians and high-end kitchen fitters choose bespoke frames to guarantee a perfect result that reflects the quality of their work.
The Advantages of Made-to-Order Spacers
Opting for a custom solution provides benefits that generic products simply cannot match, ensuring your installation is both safe and visually perfect.
-
Precise Fitment: A spacer made to your exact measurements ensures there are no visible gaps between the wall and the faceplate, creating a seamless, integrated look.
-
Colour and Finish Matching: Bespoke spacers can often be ordered in different colours (such as white, black, or grey) to match your chosen faceplates or decor.
-
Support for Complex Setups: Custom frames can be designed for smart home installations, media walls with multiple outlets, or any non-standard electrical accessory. This is particularly useful for double gang sockets, which are common in modern kitchens.
Ordering Your Custom Solution
Getting a spacer made to your exact specifications is a simple and efficient process designed to eliminate guesswork.
-
Specify Your Requirements: All you need are your measurements: the depth of the extension and the type of socket (e.g., single gang, double gang, etc.).
-
Use an Online Configurator: The easiest way to order is through a dedicated design tool. The SocketSpacers.com configurator guides you through the process, allowing you to input your depth, gang size, and colour to create the perfect frame.
-
Ensure a Professional Finish: By investing in a bespoke solution, you ensure the final details of your renovation are finished to the highest standard, adding value and safety to your home.
Frequently Asked Questions
Can I extend a socket back box without rewiring?
Yes. Using a socket spacer or extension frame is specifically designed to solve the problem of a recessed back box without any need to disconnect, alter, or extend the existing circuit wiring. The spacer simply bridges the physical gap between the box and the new wall surface.
What is the maximum length of electrical screw I can safely use?
This is a common misconception. The issue is not the length of the screw, but the unsupported gap it creates. Using a very long screw without a solid spacer behind the faceplate creates a "floating socket" that is structurally weak and unsafe. The correct approach is to fill the gap with a spacer and then use a screw that is long enough to pass through the faceplate and spacer and securely engage with the back box lug.
Are socket spacers legal and compliant with UK building regulations?
Yes, provided they are fit for purpose. A correctly designed socket spacer is fully compliant with UK wiring regulations (BS 7671) because it maintains the integrity of the electrical enclosure. It forms a continuous, solid-sided barrier that contains all connections, preventing fire risk. Unsafe alternatives like stacking washers or using nuts as shims are not compliant because they do not form a solid enclosure.
How do I fix a socket that is too deep after kitchen tiling?
This is the most common scenario for needing to extend a socket back box. The solution is to measure the depth from the back box lug to the face of the new tile, then fit a socket spacer of that exact depth. This will bring the mounting points forward, allowing the faceplate to sit securely and flush on the tile surface.
What should I do if my back box is crooked as well as sunken?
A spacer cannot fix a back box that is installed crookedly in the wall. A spacer will follow the angle of the box, so the faceplate will also end up crooked. The best solution is to first have the back box re-fitted correctly so it is level. If this is not possible, a small amount of misalignment can sometimes be masked by the faceplate, but a correctly installed back box is always the best foundation.
Can I use a spacer for a light switch as well as a plug socket?
Absolutely. Spacers are designed based on UK standard gang sizes, so a single gang spacer will work for a single gang light switch or a single gang plug socket. The same applies to double gang and multi-gang configurations. They are suitable for any standard electrical accessory that uses a flush-fitted back box.
Do I need a special spacer for a double gang socket?
You need a spacer that is specifically designed for a double gang configuration. Do not attempt to use two single gang spacers side-by-side, as this will not provide the correct support or a proper seal. Custom-made double gang spacers are readily available and provide a perfect fit for the most common type of socket in UK homes.
What happens if the spacer I buy is too thick for the gap?
If the spacer is too thick, the socket faceplate will protrude from the wall instead of sitting flush. This highlights the main problem with buying standard, off-the-shelf extension frames that only come in fixed sizes like 32mm. This is why measuring accurately and ordering a bespoke spacer made to the exact millimetre is the only way to guarantee a perfect, professional finish.
Electrical Safety
Always isolate the circuit and confirm it is dead before removing a socket or switch faceplate. Only carry out the work if you are competent to do so. If you find damaged wiring, signs of overheating or anything unsafe, stop and contact a qualified electrician.