
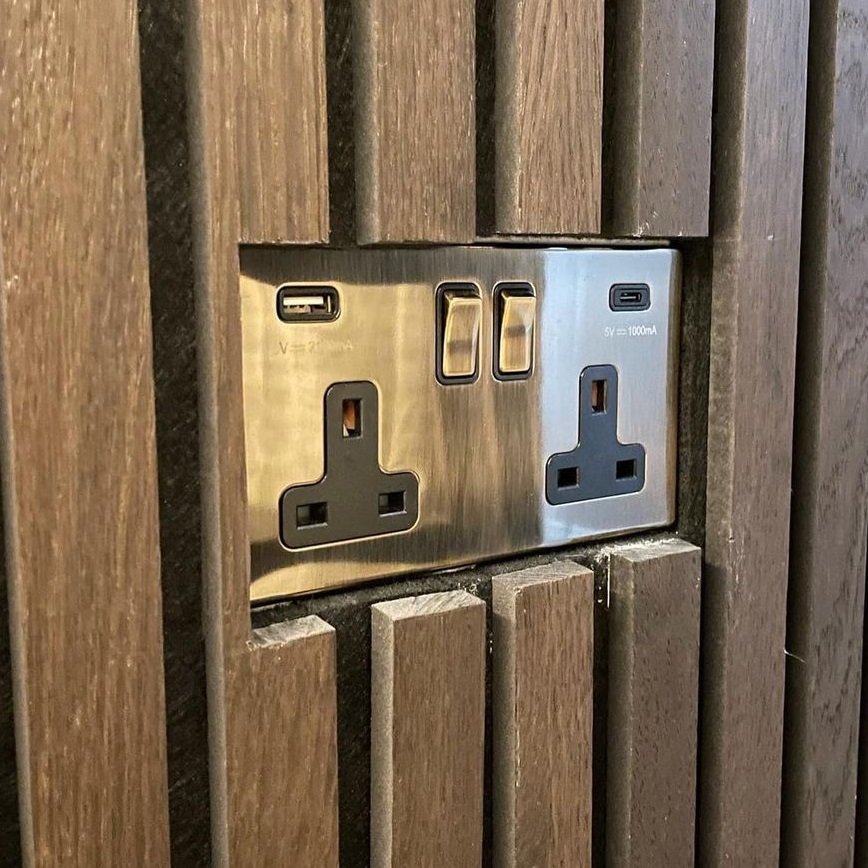
The visual appeal of new wall panelling is often ruined the moment you realise your electrical sockets no longer sit flush against the surface. You've likely discovered that standard off-the-shelf options are either too thin or frustratingly thick, leaving you with a socket that feels loose or "floats" behind the timber. It's a common technical frustration that makes an otherwise professional renovation look unfinished. Finding the right socket spacer for panelled wall installations is the only way to bridge this gap securely and maintain the structural integrity of your electrical points.
In this guide, you'll learn how to achieve a perfectly flush, professional finish that complies with the latest BS 7671:2018+A4:2026 UK electrical safety standards. We'll explain why bespoke measurements are essential and how to select a solution that matches the exact depth of your specific panelling. If you want to eliminate the guesswork, you can use our Build My Spacer configurator to specify the precise dimensions required for a stable result. We will cover everything from wiring space requirements to the mechanical benefits of a tailored fit, ensuring your sockets are as safe as they are seamless.
Key Takeaways
- Learn why a sunken backbox requires a dedicated socket spacer for panelled wall projects to prevent mechanical strain and ensure long-term wiring stability.
- Understand the safety risks associated with using longer screws alone and why they fail to provide the structural support required by UK electrical regulations.
- Discover the professional techniques for measuring panelling depth using digital calipers to guarantee a flush and seamless faceplate finish.
- Use the Build My Spacer configurator to order a bespoke solution tailored to the exact millimetre of your unique wall project.
- Identify the differences between flimsy off-the-shelf options and high-quality bespoke frames designed specifically for single, double, or multi-gang UK backboxes.
Table of Contents
- Why You Need a Dedicated Socket Spacer for Panelled Walls
- Why Standard Off-the-Shelf Spacers Often Fail
- Safety First: The Hidden Dangers of Floating Sockets
- How to Measure for Your Bespoke Socket Spacer
- The SocketSpacers.com Advantage: Bespoke Quality for UK Homes
Why You Need a Dedicated Socket Spacer for Panelled Walls
Installing wall panelling is an effective way to transform a room, but it fundamentally changes the relationship between your electrical faceplates and the wall. Most UK homes feature electrical accessories mounted directly to a backbox fixed into the masonry or studwork. When you add a layer of MDF, real wood, or acoustic felt, the faceplate must move forward to sit on the new surface. This creates a "sunken backbox" scenario. To understand why this matters, it helps to know what a pattress box is and how it functions as the structural foundation for your wiring. Without a dedicated socket spacer for panelled wall applications, you are essentially asking your faceplate to span a hollow void. This isn't just about appearance; it's about the physical stability of the installation. A recessed socket that "floats" behind the panelling looks unprofessional and suggests a DIY job that hasn't been finished to trade standards.
The Mechanics of a Recessed Backbox
Adding panelling creates a physical gap between the metal or plastic lugs of the backbox and the rear of the socket faceplate. If you attempt to bridge this gap by simply using longer screws, you create a mechanical pivot point. As you tighten the screws, the faceplate is pulled backwards into the soft panelling or the empty space behind it. This often leads to the plastic faceplate warping or cracking under the pressure. A proper spacer provides a solid, incompressible bridge. It ensures that when you tighten the accessory, it sits against a firm surface that matches the exact thickness of your panelling. This prevents the socket from moving when you plug in or remove a device, which is a common cause of internal wire fatigue over time.
Panelled Wall Types and Their Unique Challenges
Different materials present distinct installation hurdles. Acoustic slatwall is particularly difficult because the felt backing provides no structural support, whilst the gaps between the slats create uneven surfaces. Shaker-style panelling often involves varying depths between the rails and the central panels. If your socket lands on a transition point, a standard off-the-shelf shim will not suffice. Traditional tongue-and-groove panelling also varies in thickness depending on the specific profile chosen. Because every project is different, we developed the Build My Spacer tool. It allows you to specify the exact depth required to ensure your socket spacer for panelled wall installations fits perfectly regardless of the material used. A bespoke fit means you won't have to settle for "close enough" or use multiple thin shims that can slip during installation.
Why Standard Off-the-Shelf Spacers Often Fail
Many homeowners assume that a quick trip to a local DIY store will solve their installation issues. However, mass-market retailers typically stock fixed-depth accessories in 10mm or 20mm increments. If you are working with 15mm MDF panelling, a 10mm spacer leaves a dangerous 5mm void. This gap prevents the faceplate from sitting flush, creating a "floating" effect that compromises both safety and aesthetics. A socket spacer for panelled wall projects must match the material thickness exactly to be effective. Relying on "close enough" measurements often leads to a finished result that looks like an afterthought rather than a professional integration.
Material quality is another significant factor where standard options fall short. Mass-produced spacers are often made from thin, flexible plastic that can compress or warp when the faceplate screws are tightened. In contrast, high-quality bespoke manufacturing produces a rigid, solid frame that provides a stable foundation. Attempting to stack multiple thin spacers is a common but flawed workaround. This creates multiple failure points and an unstable stack that can shift during use, leading to a misaligned socket and an unprofessional finish. Furthermore, standard spacers are rarely designed to accommodate the "proud" nature of modern decorative faceplates, which often feature curved edges or increased depth that requires a more precise fit.
The Precision Gap: Why Millimetres Matter
Even a 2mm discrepancy can cause a socket to wobble when you plug in an appliance. Whilst some try to trim standard plastic spacers to size with a hacksaw or utility knife, achieving a perfectly level cut by hand is nearly impossible. This DIY approach usually results in an uneven surface that causes the faceplate to sit at an angle against the panelling. Bespoke manufacturing is the only reliable way to achieve a professional "zero-gap" finish. You can use our Build My Spacer configurator to specify the exact depth needed for your specific project, ensuring the frame sits perfectly between the backbox and the faceplate.
Multi-Gang Limitations in Retail Stores
Finding a socket spacer for panelled wall applications becomes significantly harder when dealing with multi-gang setups. Standard hardware shops rarely stock 3-gang or 4-gang extension frames, leaving installers to "bodge" a solution. Using two single spacers for a double gang socket is a poor choice that looks messy and lacks structural unity. A single-piece bespoke extension frame is always the superior choice for larger electrical fittings, providing a clean line and a secure mount. If you are dealing with a complex layout, you can explore our bespoke extension frames to find a solution that matches your specific configuration.
Safety First: The Hidden Dangers of Floating Sockets
Many DIY enthusiasts believe that simply purchasing longer M3.5 screws is a sufficient fix for a recessed socket. Screws are fasteners, not structural supports. When you rely solely on length to bridge a gap, you leave the socket "floating" without any rear reinforcement. Every time you insert or remove a plug, the faceplate moves slightly. This repetitive motion puts significant mechanical strain on the copper conductors and terminal connections inside the backbox. Over time, these connections can loosen, leading to intermittent power or high-resistance joints that generate heat. A dedicated socket spacer for panelled wall applications provides the rigid foundation required to keep these electrical connections static and safe.
Beyond mechanical failure, an unsealed gap presents a serious environmental risk. Gaps between the faceplate and the backbox allow household dust, pet hair, and construction debris to accumulate near live terminals. If an electrical fault occurs, these materials can act as tinder. This is particularly concerning when using MDF or timber panelling, as these are combustible materials. UK electrical best practices, specifically those outlined in BS 7671:2018+A4:2026, emphasise the need for equipment to be installed in a way that contains heat and prevents the spread of fire. A professional installation ensures that the protective envelope of the backbox is effectively extended to the new wall surface.
Structural Integrity and the Faceplate
Modern plastic faceplates are designed to be clamped against a flat, solid surface. Without a solid socket spacer for panelled wall installations, the faceplate lacks the necessary counter-pressure to withstand the force of a heavy-duty plug being pushed into the terminals. This often results in the plastic cracking around the screw holes or the entire accessory "popping" out of the wall. A bespoke spacer acts as a solid bridge, transferring the force directly to the backbox rather than the decorative panelling. This ensures the installation remains rock-solid even under heavy daily use.
Preventing Arcing and Fire Risks
The primary role of an electrical backbox is to contain any potential arcing or sparks within a non-combustible enclosure. When panelling creates a void, that containment is broken, allowing heat to build up against flammable timber or felt backing. A bespoke spacer seals the gap between the metal box and the room, ensuring any internal faults are safely contained. If you are unsure of the depth required to seal your installation properly, the Build My Spacer tool can help you specify a frame that meets your exact safety requirements. This simple addition transforms a hazardous "bodge" into a compliant, professional-grade installation.

How to Measure for Your Bespoke Socket Spacer
Before you begin any adjustments or measurements, you must isolate the power at the consumer unit. This is a critical safety step that should never be ignored, even if you are only checking depths. To achieve a professional finish, you need precise tools. A digital caliper is the preferred choice for measuring depth because it provides a clear decimal reading. If you don't have calipers, a high-quality steel rule can suffice, provided you view the measurements at eye level to avoid parallax error. Plastic tape measures are generally too flexible for the millimetre precision required for a bespoke fit.
The primary goal of a socket spacer for panelled wall installations is to bridge the distance between the recessed backbox and the new faceplate position. To find this depth, measure from the front edge of the metal backbox to the outermost finished surface of your panelling. It is best to take measurements at the top, bottom, and sides of the box. If your wall is slightly uneven, use the largest measurement to ensure the faceplate sits flush against the highest point of the panelling. This methodical approach prevents the socket from being pulled into a void when you tighten the screws.
You must also account for any hidden layers that add to the total thickness. This includes adhesive beads, acoustic felt backing, or any remaining plaster skim. For example, if you are using 12mm MDF fixed with a 2mm layer of grab adhesive, your required spacer depth is 14mm. Neglecting these small increments is the most common reason for a socket still feeling loose after installation. A precise measurement ensures the spacer provides a solid, incompressible bridge for the socket lugs.
Measuring Complex Panelling (Shaker or Slat)
Slatwall and shaker designs require extra attention because the surface depth varies across the wall. If your socket sits across a join or a decorative rail, measure the depth at the point where the faceplate will make contact. For acoustic slatwall, always measure to the front of the timber slat rather than the felt background. This ensures the spacer provides the necessary counter-pressure for a secure fit. You should also consider how the spacer colour will look against your panelling. Choosing a finish that complements your wood or paint choice helps the extension frame blend seamlessly into the design.
Ordering Your Bespoke Extension Frame
Once you have your measurements, you can translate them into a custom order. Providing the exact millimetre depth is far superior to rounding up or down. A rounded measurement leads to a socket that either sits proud of the wall or remains slightly recessed. You can use our Build My Spacer tool to input your specific requirements and gang configuration. This tool allows you to specify the precise depth needed for your project, ensuring you receive a bespoke extension frame that fits perfectly the first time. Taking the time to measure accurately now will save you the frustration of a wobbly or unsafe socket later.
The SocketSpacers.com Advantage: Bespoke Quality for UK Homes
SocketSpacers.com focuses on solving the specific spatial challenges that occur during high-end interior renovations. Unlike mass-produced alternatives found on global marketplaces, every socket spacer for panelled wall installations we provide is manufactured to your exact specifications. We understand that UK homes vary significantly in construction, from Victorian masonry to modern stud partitions. Our made-to-order approach ensures you don't have to settle for a 10mm shim when your project requires exactly 14.5mm. By providing single, double, and multi-gang options, we cater to the full range of standard UK backboxes with millimetre precision.
One often overlooked benefit of our extension frames is the increased wiring space they provide. Modern smart home switches and dimmers are frequently deeper than traditional accessories, which can make fitting them into a standard backbox difficult. By using a bespoke extension frame, you effectively increase the internal volume of the enclosure. This makes it much easier to organise cables without crushing them, which reduces the risk of heat build-up or loose connections. It's a practical solution that prioritises both safety and ease of installation for the homeowner or electrician.
Custom Manufacturing vs. Standard Hardware
Our manufacturing process prioritises durability and precision over mass-market convenience. Standard hardware store spacers are often flimsy and prone to warping, whilst our bespoke large extension frames are rigid and designed to withstand the pressure of daily use. Tradespeople often prefer our solutions for high-end renovations because they eliminate the need for on-site "bodging" with wood offcuts or stacked plastic shims. A single-piece bespoke frame is faster to install and provides a much more stable foundation for the faceplate, ensuring the finish remains rock-solid for years.
Achieving the Perfect Flush Finish
A feature wall is only as good as its finishing touches. Our spacers eliminate the "floating socket" look that can ruin the aesthetic of expensive acoustic slats or shaker panels. We offer a wide range of custom sizes, allowing you to transition smoothly from shallow shims to deep extension frames. This level of customisation ensures that your electrical points look like an intentional part of the design rather than a frustrating obstacle. If you are ready to complete your project to a professional standard, you can order your bespoke socket spacers for panelled walls today or use the Build My Spacer tool to specify your exact requirements.
Achieve a Professional Finish for Your Panelled Wall
Transitioning from a sunken backbox to a flush finish requires more than just longer screws. You've seen how millimetre precision prevents mechanical strain and ensures compliance with UK safety standards. Using a bespoke socket spacer for panelled wall installations provides the rigid support necessary for a secure, long-term result. It's the difference between a wobbly DIY fix and a professional-grade feature wall that stands up to daily use. By bridging the gap with a solid extension frame, you protect your internal wiring and ensure your faceplates sit perfectly against the new surface.
If you are ready to eliminate the frustration of floating sockets, you can use our Build My Spacer configurator to specify your exact requirements. We provide custom-manufactured solutions to your exact millimetre specifications for single, double, and multi-gang UK sockets. These extension frames are trusted by UK tradespeople to deliver the high-end finish that off-the-shelf products cannot match. Browse our range of bespoke socket spacers and extension frames today to secure your electrical accessories with confidence. Your renovation deserves a finish that is as safe as it is seamless.
Frequently Asked Questions
Do I need a socket spacer for a panelled wall if I use longer screws?
Yes, you still require a spacer to provide structural support. Longer screws only act as fasteners and do not bridge the physical void behind the faceplate. Without a dedicated socket spacer for panelled wall installations, the accessory remains "floating." This causes the faceplate to flex or crack when you plug in appliances, eventually leading to loose internal wiring and potential electrical faults.
Can I stack multiple standard spacers to reach the depth of my panelling?
Stacking multiple thin spacers is not recommended because it creates an unstable foundation. Each additional shim introduces a new failure point where the stack can shift or slip during installation. A single-piece bespoke frame is far more secure. It provides a solid, incompressible bridge that ensures your socket remains perfectly level and stationary throughout its lifespan.
How do I know what depth of socket spacer I need for my Shaker panelling?
You should measure the distance from the front edge of the recessed backbox to the outermost finished surface of the panelling. If your socket sits on a raised rail, measure to that specific surface using digital calipers for accuracy. Once you have this measurement, you can specify the exact millimetre depth using our Build My Spacer configurator.
Are bespoke socket spacers compatible with all UK plug sockets?
Our bespoke spacers are designed to fit standard UK single and double gang backbox configurations. They are compatible with accessories from all major UK manufacturers. Because we manufacture to order, we can also accommodate the slightly larger footprints of premium decorative faceplates. This ensures a clean, professional fit that standard off-the-shelf shims often fail to provide.
Can you manufacture spacers for 3-gang or 4-gang media wall sockets?
Yes, we specialise in multi-gang extension frames that are typically unavailable in high street DIY stores. We can produce single-piece spacers for triple, quadruple, or custom-configured media plates to your required depth. A single bespoke frame is significantly more stable than trying to align multiple single spacers side by side, resulting in a much cleaner aesthetic for your feature wall.
What material are your bespoke socket spacers made from?
We manufacture our spacers from high-quality, rigid plastic that is specifically engineered to resist compression. Unlike the soft, flexible materials used for mass-produced shims, our bespoke frames provide a solid foundation for the socket lugs. This rigidity is essential for maintaining a flush finish and preventing the faceplate from bowing when the mounting screws are tightened against the panelling.
Is it easy to install a socket spacer myself on a panelled wall?
Installation is a simple process for a competent DIY enthusiast, provided you isolate the power at the consumer unit first. Once the circuit is safe, you place the spacer between the backbox and the faceplate before securing them with standard M3.5 screws. If you feel uncomfortable handling electrical accessories, we always recommend hiring a qualified electrician to complete the final fitting.
Do socket spacers help with overcrowded wiring in a shallow backbox?
Using a socket spacer for panelled wall projects effectively increases the internal volume available for your wiring. By moving the faceplate forward, you create more room to organise cables safely without crushing them. This is particularly beneficial when installing smart switches or dimmers, which often feature bulky internal components that require additional depth to sit correctly within the wall.
Electrical Safety
Always isolate the circuit and confirm it is dead before removing a socket or switch faceplate. Only carry out the work if you are competent to do so. If you find damaged wiring, signs of overheating or anything unsafe, stop and contact a qualified electrician.