
Why is it that a "standard" 10mm spacer is almost always the wrong thickness for your specific wall depth? It is a common frustration when finishing a renovation. You have invested in premium decorative faceplates, yet they sit unevenly or wobble because the backbox is recessed just a few millimetres too far. You are likely left wondering, "what size socket spacer do I need" to finally achieve that professional, flush finish without the guesswork.
We understand that off-the-shelf solutions rarely account for the unique realities of plastered walls or bespoke tiled splashbacks. Loose-fitting outlets are more than an eyesore; they are a safety hazard that can lead to arcing or loosened wires. This guide provides a precision measurement framework to ensure your electrical fittings are safe, sturdy, and perfectly aligned. By using our Build My Spacer configurator tool, you can move away from "near enough" and secure a bespoke component tailored to your exact gap. We will walk you through the step-by-step process of measuring your electrical gaps, explaining why correct screw alignment is vital for a safe installation and how to choose the perfect depth for a sturdy, professional result.
Key Takeaways
- Learn how to use a straightedge and metric ruler to determine the exact distance from a recessed backbox to the finished wall surface.
- Stop guessing what size socket spacer do I need by moving beyond standard 10mm options and choosing bespoke depths tailored to your specific renovation.
- Understand why measuring the perimeter of your faceplate is essential for ensuring a flush fit with decorative or multi-gang fittings.
- Verify measurements at multiple points around the backbox to account for uneven plaster or tiling for a professional, wobble-free result.
- Ensure a safe installation by confirming you have the correct M3.5 screw lengths to reach through the spacer and into the backbox securely.
Table of Contents
Understanding Why Socket Spacer Size Matters
A socket spacer is a precision component designed to fill the physical void between a recessed Pattress box and the final wall surface. When you are planning a renovation, using the Build My Spacer tool early ensures you order the exact millimetre depth required for a professional result. Identifying what size socket spacer do I need is the first step in avoiding the "floating socket" effect, where the faceplate fails to make contact with the wall substrate. This lack of support is more than just a cosmetic issue; it compromises the mechanical integrity of the entire electrical fitting. Every time you plug or unplug an appliance, you exert physical pressure on the faceplate. Without a solid spacer to provide a seat, this force is transferred directly to the mounting screws and the plastic housing, which can lead to failure over time.
The Problem with Sunken Backboxes
New wall finishes such as decorative panelling, kitchen tiling, or thick acoustic plasterboard often leave the original electrical box sitting too deep. This creates a gap that forces the faceplate screws to bridge an unsupported distance. Over-tightening these screws to close the gap puts immense strain on the plate, often causing the plastic to crack or the decorative finish to warp. A sunken box also means the socket is not securely anchored, leading to a wobbly installation that feels low-quality and unfinished. When the backbox is not flush, the screws are the only thing holding the socket in place, which is insufficient for the long-term wear and tear of a busy household.
Aesthetic and Safety Benefits of Correct Sizing
Achieving a flush finish is essential for both the look and safety of your home. A correctly sized spacer ensures there are no unsightly gaps behind expensive faceplates where dust and debris can accumulate. From a safety perspective, a bespoke spacer prevents internal wiring from being exposed or accessible through gaps at the side of the fitting. By providing a continuous, solid surface from the box to the faceplate, you create a seamless transition that looks intentional and professional. Custom sizes allow for this precision, ensuring the spacer matches the perimeter of your fitting perfectly whilst providing the sturdy support needed for daily use. A well-fitted spacer makes the socket feel like a permanent part of the wall rather than a loose afterthought.

How to Measure the Depth of the Spacer You Need
The depth is the most critical measurement to ensure your socket sits flush against the new wall finish. For the highest level of accuracy, you should always record your measurements in millimetres. If you are struggling with a recessed fitting, learning how to fix this problem with an electrical box extender starts with a clear understanding of the physical gap you need to bridge.
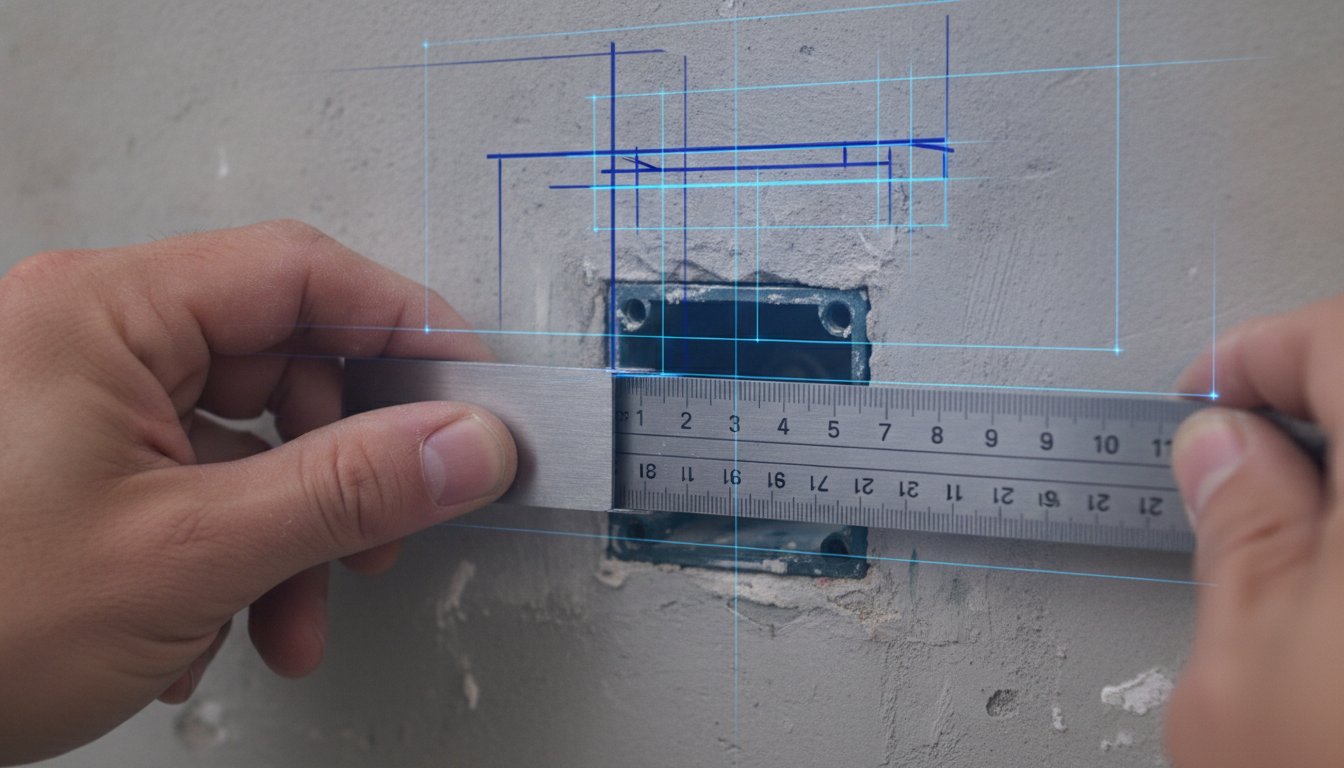
Depth is the distance from the front edge of the backbox to the finished wall surface.
The Straightedge Method
To get an accurate reading, you will need a straightedge, such as a spirit level or a flat piece of timber, and a metric ruler. Place the straightedge horizontally across the wall opening where the socket will be installed. Use your ruler to measure the distance from the back of the straightedge to the screw lugs on the backbox. It is vital to take measurements at both the top and bottom of the box. Walls are rarely perfectly flat; taking two readings allows you to account for any slight wall tilt or uneven plasterwork. If the readings differ, use the larger measurement to ensure the spacer provides full support across the entire perimeter of the fitting.
Accounting for Tiles and Panelling
Measuring becomes slightly more complex if the final wall finish is not yet in place. If you are measuring before tiling, you must calculate the total depth by adding the thickness of the tile itself plus 2mm for the adhesive bed. For example, an 8mm tile with a standard adhesive bed requires a 10mm spacer. When working with decorative wall panelling, ensure you measure to the front face of the decorative board rather than the supporting batten behind it. This ensures the faceplate sits perfectly on the visible surface without leaving a gap that could collect dust or compromise the finish.
Once you have these figures, you can stop asking "what size socket spacer do I need" and move towards a permanent solution. Always round up to the nearest millimetre if your measurement falls between two points. This ensures the spacer provides a solid, continuous seat for the socket. If you have your measurements ready, you can Build My Spacer using our configurator to specify the exact dimensions for your project. A bespoke fit is always preferable to stacking multiple thin spacers, which can lead to instability. For those dealing with non-standard renovations, choosing UK socket spacers with a custom depth provides the precision that off-the-shelf products cannot offer.
Standard vs Custom Sizes: When to Go Bespoke
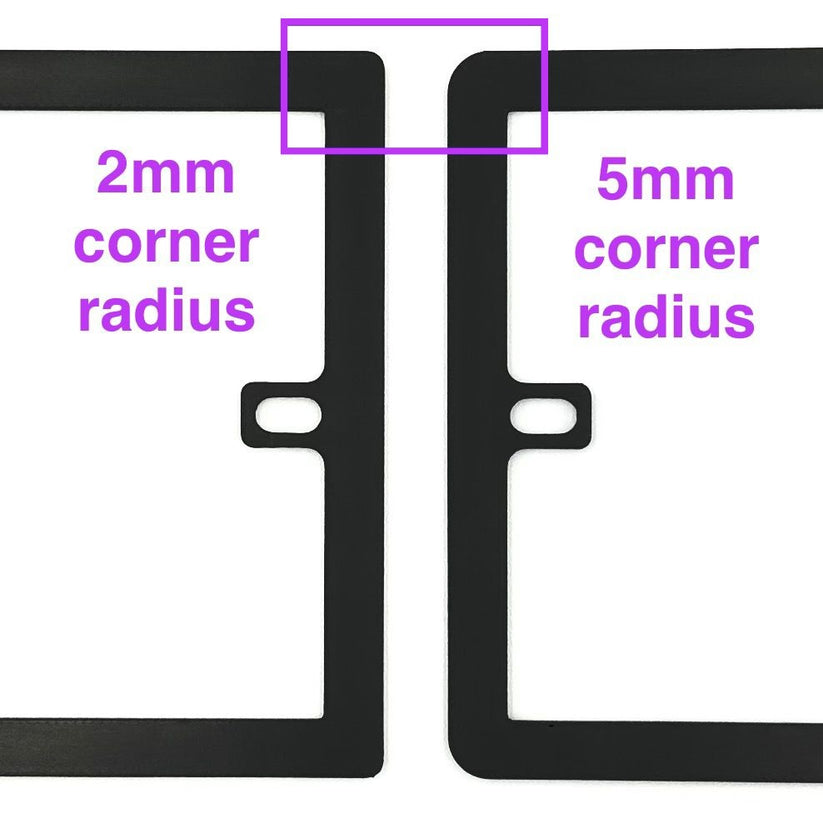
When you are browsing a local DIY store, you will likely find standard off-the-shelf spacers that only come in fixed 10mm or 15mm increments. These products are manufactured for mass-market convenience, but they often fail to address the complexities of real-world renovations. If you have ever found yourself asking "what size socket spacer do I need" after a standard frame failed to bridge the gap, it is because your wall depth is likely a non-standard measurement. Bespoke manufacturing allows you to specify depths such as 7mm, 13mm, or even 22mm, ensuring the spacer remains invisible once the socket is tightened into place. Beyond depth, custom frames can be designed with precise corner radii to perfectly match modern curved faceplates, providing a level of finish that standard square-edged spacers cannot achieve.
Why 10mm Often Fails
The common industry claim is that 10mm is the standard for tiled walls. In practice, this rarely holds true. A standard ceramic tile might be 8mm thick, but once you factor in a 4mm or 6mm bed of adhesive, the total depth required usually reaches 12mm to 14mm. Using a 10mm spacer in this scenario results in the same wobbly socket issue you intended to fix, as the faceplate screws still have several millimetres of unsupported space to bridge. Conversely, using a spacer that is even slightly too thick will leave an unsightly gap between the spacer and the wall finish, preventing the faceplate from sitting flush. Precision is the only way to avoid these compromises.
The Flexibility of Bespoke Depths
Choosing bespoke options gives you the freedom to match any architectural requirement. This flexibility is particularly useful for custom double gang socket spacers, where the larger surface area makes any misalignment much more noticeable. Custom frames can also be manufactured to much greater depths for specific scenarios, such as creating a surface-mount look on a flush-mounted box or providing extra wiring room.
Modern electrical fittings have also increased the demand for custom sizing. Many homeowners now install deep USB sockets or smart home modules into existing shallow backboxes. These components often require a few extra millimetres of clearance that a standard extension frame cannot provide without looking bulky. By using the Build My Spacer configurator, you can order a frame that provides the exact internal clearance needed whilst maintaining a slim, professional profile on the wall. This tailored approach ensures that your sockets are safe, sturdy, and aesthetically perfect, regardless of how deep the backbox is recessed.

Measuring Width and Height for Different Gang Sizes
While depth determines how flush the fitting sits against the wall, the width and height of the frame determine the overall visual quality of the installation. If you are still asking what size socket spacer do I need, you must consider the physical footprint of your faceplate. A spacer that is too wide will protrude from the sides, creating an unsightly ledge that collects dust and looks like a DIY error. Conversely, a spacer that is too small will not provide sufficient support for the outer edges of the plate. This lack of support can lead to the faceplate cracking if the mounting screws are tightened too much. You should always measure the external dimensions of your specific faceplate rather than relying on generic industry assumptions.
Single vs Double Gang Dimensions
Standard UK single sockets are typically 86mm x 86mm, whilst double sockets are 146mm x 86mm. However, decorative boutique brands frequently deviate from these measurements to create a specific aesthetic. For example, some premium metal plates might be 90mm wide or have a significantly different corner radius. It is also vital to check if your faceplate is a "flat plate" or a "standard" raised style. Flat plates often have sharper corners that require a tighter radius on the spacer to remain hidden. Always measure the actual plate you have purchased with a precise ruler before using the Build My Spacer tool to input your final requirements.
Measuring Multi-Gang and Custom Frames
For multi-gang plates used in kitchen islands or home cinema hubs, the total horizontal width is the priority. You may require a bespoke large extension frame to accommodate these wider configurations, which can span three or four gangs. Beyond the plate itself, you must also note any obstructions near the socket. If your electrical point is positioned close to a door architrave, a kitchen cabinet, or a tall skirting board, you might need a narrower spacer frame that sits slightly inside the faceplate perimeter to avoid a collision. Taking these precise dimensions ensures the spacer remains functional without being conspicuous.
Order your precision-fit UK socket spacers today to eliminate unsightly gaps and ensure a sturdy, professional finish for any gang size.
Final Checklist Before You Order
Before finalising your order, a final verification of your measurements is essential to ensure a seamless installation. Walls are rarely perfectly plumb; checking the depth at the top, bottom, and both sides of the backbox confirms if the plaster or tile thickness is consistent. Ensuring you have the definitive answer to what size socket spacer do I need prevents frustrating delays during the final fitting stage. This precision is what separates a high-quality renovation from a standard DIY job. Once you have confirmed these dimensions, you can visit the Build My Spacer configurator to finalise your bespoke requirements with total confidence.
Screw Length and Alignment
A common misconception found in online tutorials suggests that simply using longer screws is enough to fix a recessed box. This approach is flawed because longer screws do not provide the structural support that a solid spacer offers. While standard socket screws are typically 25mm or 35mm in length, deep spacers may require 50mm or even 75mm M3.5 electrical screws. You must ensure that the spacer has clear, unobstructed holes for these screws to pass through. Before fitting, check that the backbox lugs are clean and the threads are not damaged or filled with plaster. A correctly sized spacer acts as a rigid bridge, allowing the screw to pull the faceplate against a solid surface rather than leaving it to flex against an air gap.
Choosing the Right Material and Finish
The material of your spacer must offer the necessary heat resistance and durability for long-term electrical use. While the spacer is often hidden, selecting a colour that complements your faceplate finish is a mark of professional attention to detail. For example, a white spacer is ideal for standard plastic fittings, whilst a dark or bespoke colour might be better suited for premium metal plates. If you are also addressing light switches, you might consider a custom depth light switch spacer in a matching finish for a discreet, uniform look throughout the room.
Finally, confirm that the corner radius matches your specific faceplate style. Modern sockets often feature rounded edges that require a specific radius to ensure the spacer does not peek out from the corners. Taking a few moments to double-check these technical details ensures that your bespoke frame provides a sturdy, safe, and aesthetically perfect result. With your checklist complete, you are ready to secure the exact components needed for a professional flush finish.
Achieve a Seamless Electrical Finish Today
Securing a professional, flush finish for your electrical fittings depends entirely on precision. By applying the measurement techniques discussed, you can eliminate wobbly sockets and unsightly gaps caused by recessed backboxes. Remember that a solid spacer is essential for structural support; relying on longer screws alone often leads to cracked faceplates and unstable installations. Stop asking what size socket spacer do I need and start specifying the exact dimensions your project requires. Our spacers are expertly manufactured in the UK and trusted by professional electricians nationwide to provide custom depths to the nearest millimetre.
Whether you are finishing a kitchen renovation or installing decorative plates in a living space, a bespoke solution ensures your home remains safe and aesthetically perfect. You can Use the Build My Spacer tool to create your perfect fit and order a frame tailored to your unique wall depth. Taking the time to verify your measurements ensures a sturdy result that will last for years. You are now ready to complete your installation with the quiet confidence of a job well done.
Frequently Asked Questions
What is the standard size for a UK socket spacer?
Standard UK single gang spacers are 86mm by 86mm, while double gang versions are 146mm by 86mm. While these external dimensions are standard, off-the-shelf depths usually only come in 10mm or 15mm. If these fixed sizes don't match your specific wall depth, you can specify exact millimetre measurements using the Build My Spacer tool for a more precise result.
How do I know if I need a single or double gang spacer?
You can identify the gang size by looking at the width of your electrical faceplate. A single gang fitting is square and typically houses one light switch or a single plug socket. A double gang fitting is a wider, rectangular plate used for double plug sockets or multi-switch banks. The spacer must match the footprint of the plate to provide adequate support.
Can I use a socket spacer if my wall is uneven?
You can use a spacer on an uneven wall by taking depth measurements at several points around the backbox. Use the largest depth reading recorded to ensure the spacer provides a solid, level seat for the faceplate. This prevents the socket from rocking or bending when you tighten the mounting screws against a recessed or tilted box.
Do I need longer screws when using a socket spacer?
You will almost certainly require longer M3.5 electrical screws to bridge the additional depth created by the spacer. If your original screws were 25mm, you might need 40mm or 50mm versions depending on the thickness of the frame. It is vital to ensure the screws have at least 5mm of thread engagement with the backbox lugs for a secure and safe fix.
What is the maximum depth a custom socket spacer can be?
Custom socket spacers can be manufactured to any depth required for your specific installation. While standard renovations often require between 5mm and 20mm, bespoke frames can be made much deeper for specialist applications like home cinema hubs or thick acoustic walling. There is no fixed limit when ordering a bespoke component designed for your unique project.
Are socket spacers safe to use behind light switches?
Socket spacers are entirely safe and highly recommended for use behind light switches. They perform the same function as they do for plug sockets by providing a rigid seat for the switch plate. This prevents the plate from flexing or cracking and ensures the internal switch mechanism is not under mechanical strain from being pulled too deep into the wall.
How do I calculate the gap if I haven't finished tiling yet?
You can estimate the required depth by adding the manufacturer's stated tile thickness to your planned adhesive bed. Most standard ceramic tiles are 8mm thick and require a 2mm adhesive bed, suggesting a 10mm spacer. If you are using thick porcelain or natural stone, the total depth could easily reach 15mm or more.
Can I stack multiple thin spacers together?
You should avoid stacking multiple thin spacers because it reduces the overall stability of the fitting. A single bespoke spacer provides a continuous, rigid surface that is far more secure than several layers of plastic. If you are wondering what size socket spacer do I need for a deep gap, ordering one solid frame is the professional way to ensure a wobble-free finish.
Electrical Safety
Always isolate the circuit and confirm it is dead before removing a socket or switch faceplate. Only carry out the work if you are competent to do so. If you find damaged wiring, signs of overheating or anything unsafe, stop and contact a qualified electrician.