
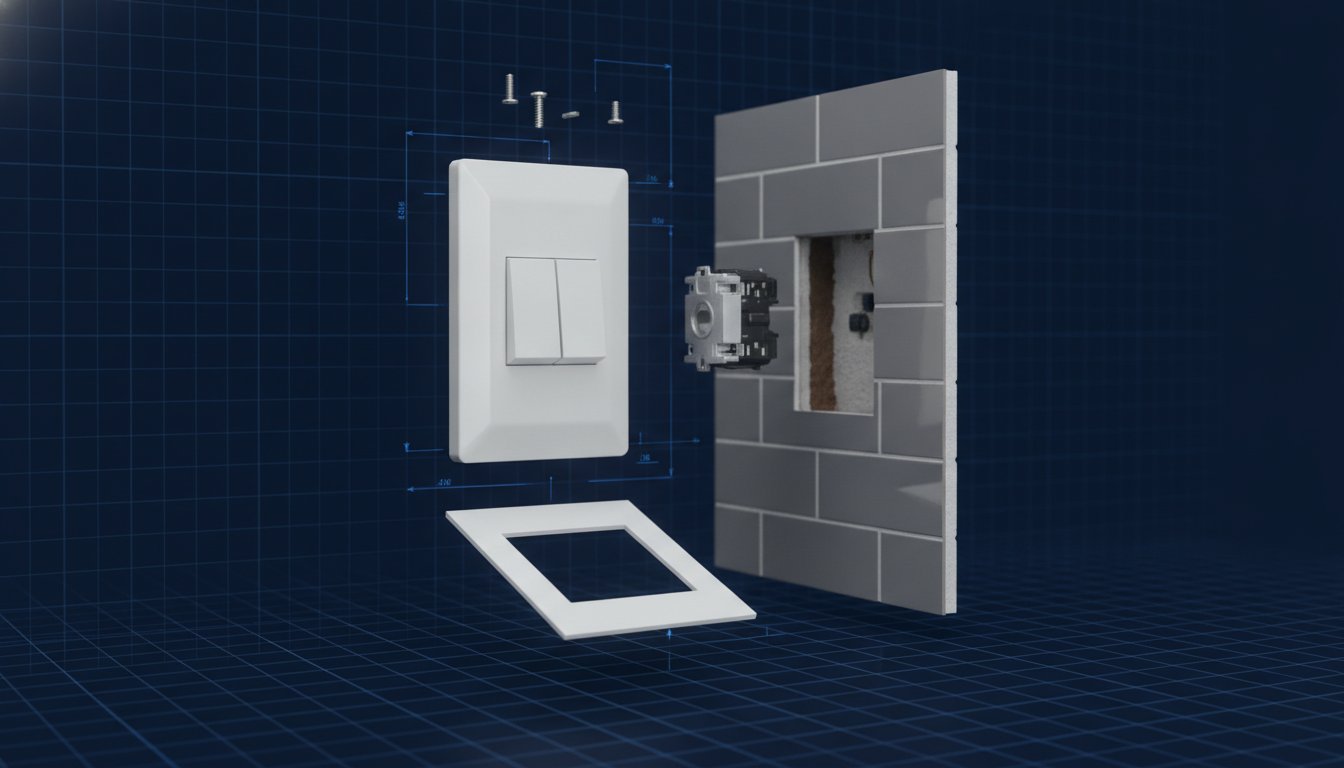
When you have finished a renovation project like tiling a kitchen or adding decorative panelling to a hallway, the last thing you want is a light switch that sits sunken into the wall. This common problem not only looks unprofessional but can also compromise the safety and stability of your electrical fittings. The search for a solution often leads to the term "light switch extender," but what does that really mean? Many products with this name are simple reach aids for children, not the structural solution you need for a recessed electrical backbox.
This guide clarifies the confusion. We will explore the difference between accessibility aids and the precision-engineered spacer plates required to fix depth issues. You will learn why a bespoke, custom-fit extender is the superior choice for achieving a perfectly flush, secure, and professional finish after any renovation. We will cover how to measure for the correct depth and introduce the tools that make ordering a perfect-fit component straightforward.
Table of Contents
What is a Light Switch Extender? Understanding Your Options
The term "light switch extender" can be misleading because it describes two very different products. For many, it brings to mind a plastic lever or cover designed to help children or individuals with limited mobility operate a switch. However, in the context of home renovations and electrical work, a light switch extender is a structural component. It is more accurately called a spacer plate or extension frame. Its purpose is to bridge the gap between an electrical backbox (also known as a pattress box) that is set too deep within a wall and the new, thicker wall surface.
-
Defining the Extender: In a professional context, a light switch extender is a frame that fits between the wall and the switch faceplate. It effectively extends the depth of the backbox so the switch can be mounted securely and flush with the final wall finish.
-
Reach Aids vs Spacer Plates: It is crucial to distinguish between accessibility aids, which extend the reach to the switch, and spacer plates, which extend the mounting depth of the switch.
-
The Real Problem: Homeowners and electricians often search for an "extender" when they are actually trying to solve a depth problem caused by new plaster, tiles, or panelling. The screws are too short to reach the backbox, leaving the switch floating or recessed.
-
The Spacer Solution: A spacer plate provides a solid, continuous bridge. It fills the gap, creating a stable mounting surface for the faceplate and ensuring the entire assembly is secure and visually seamless.
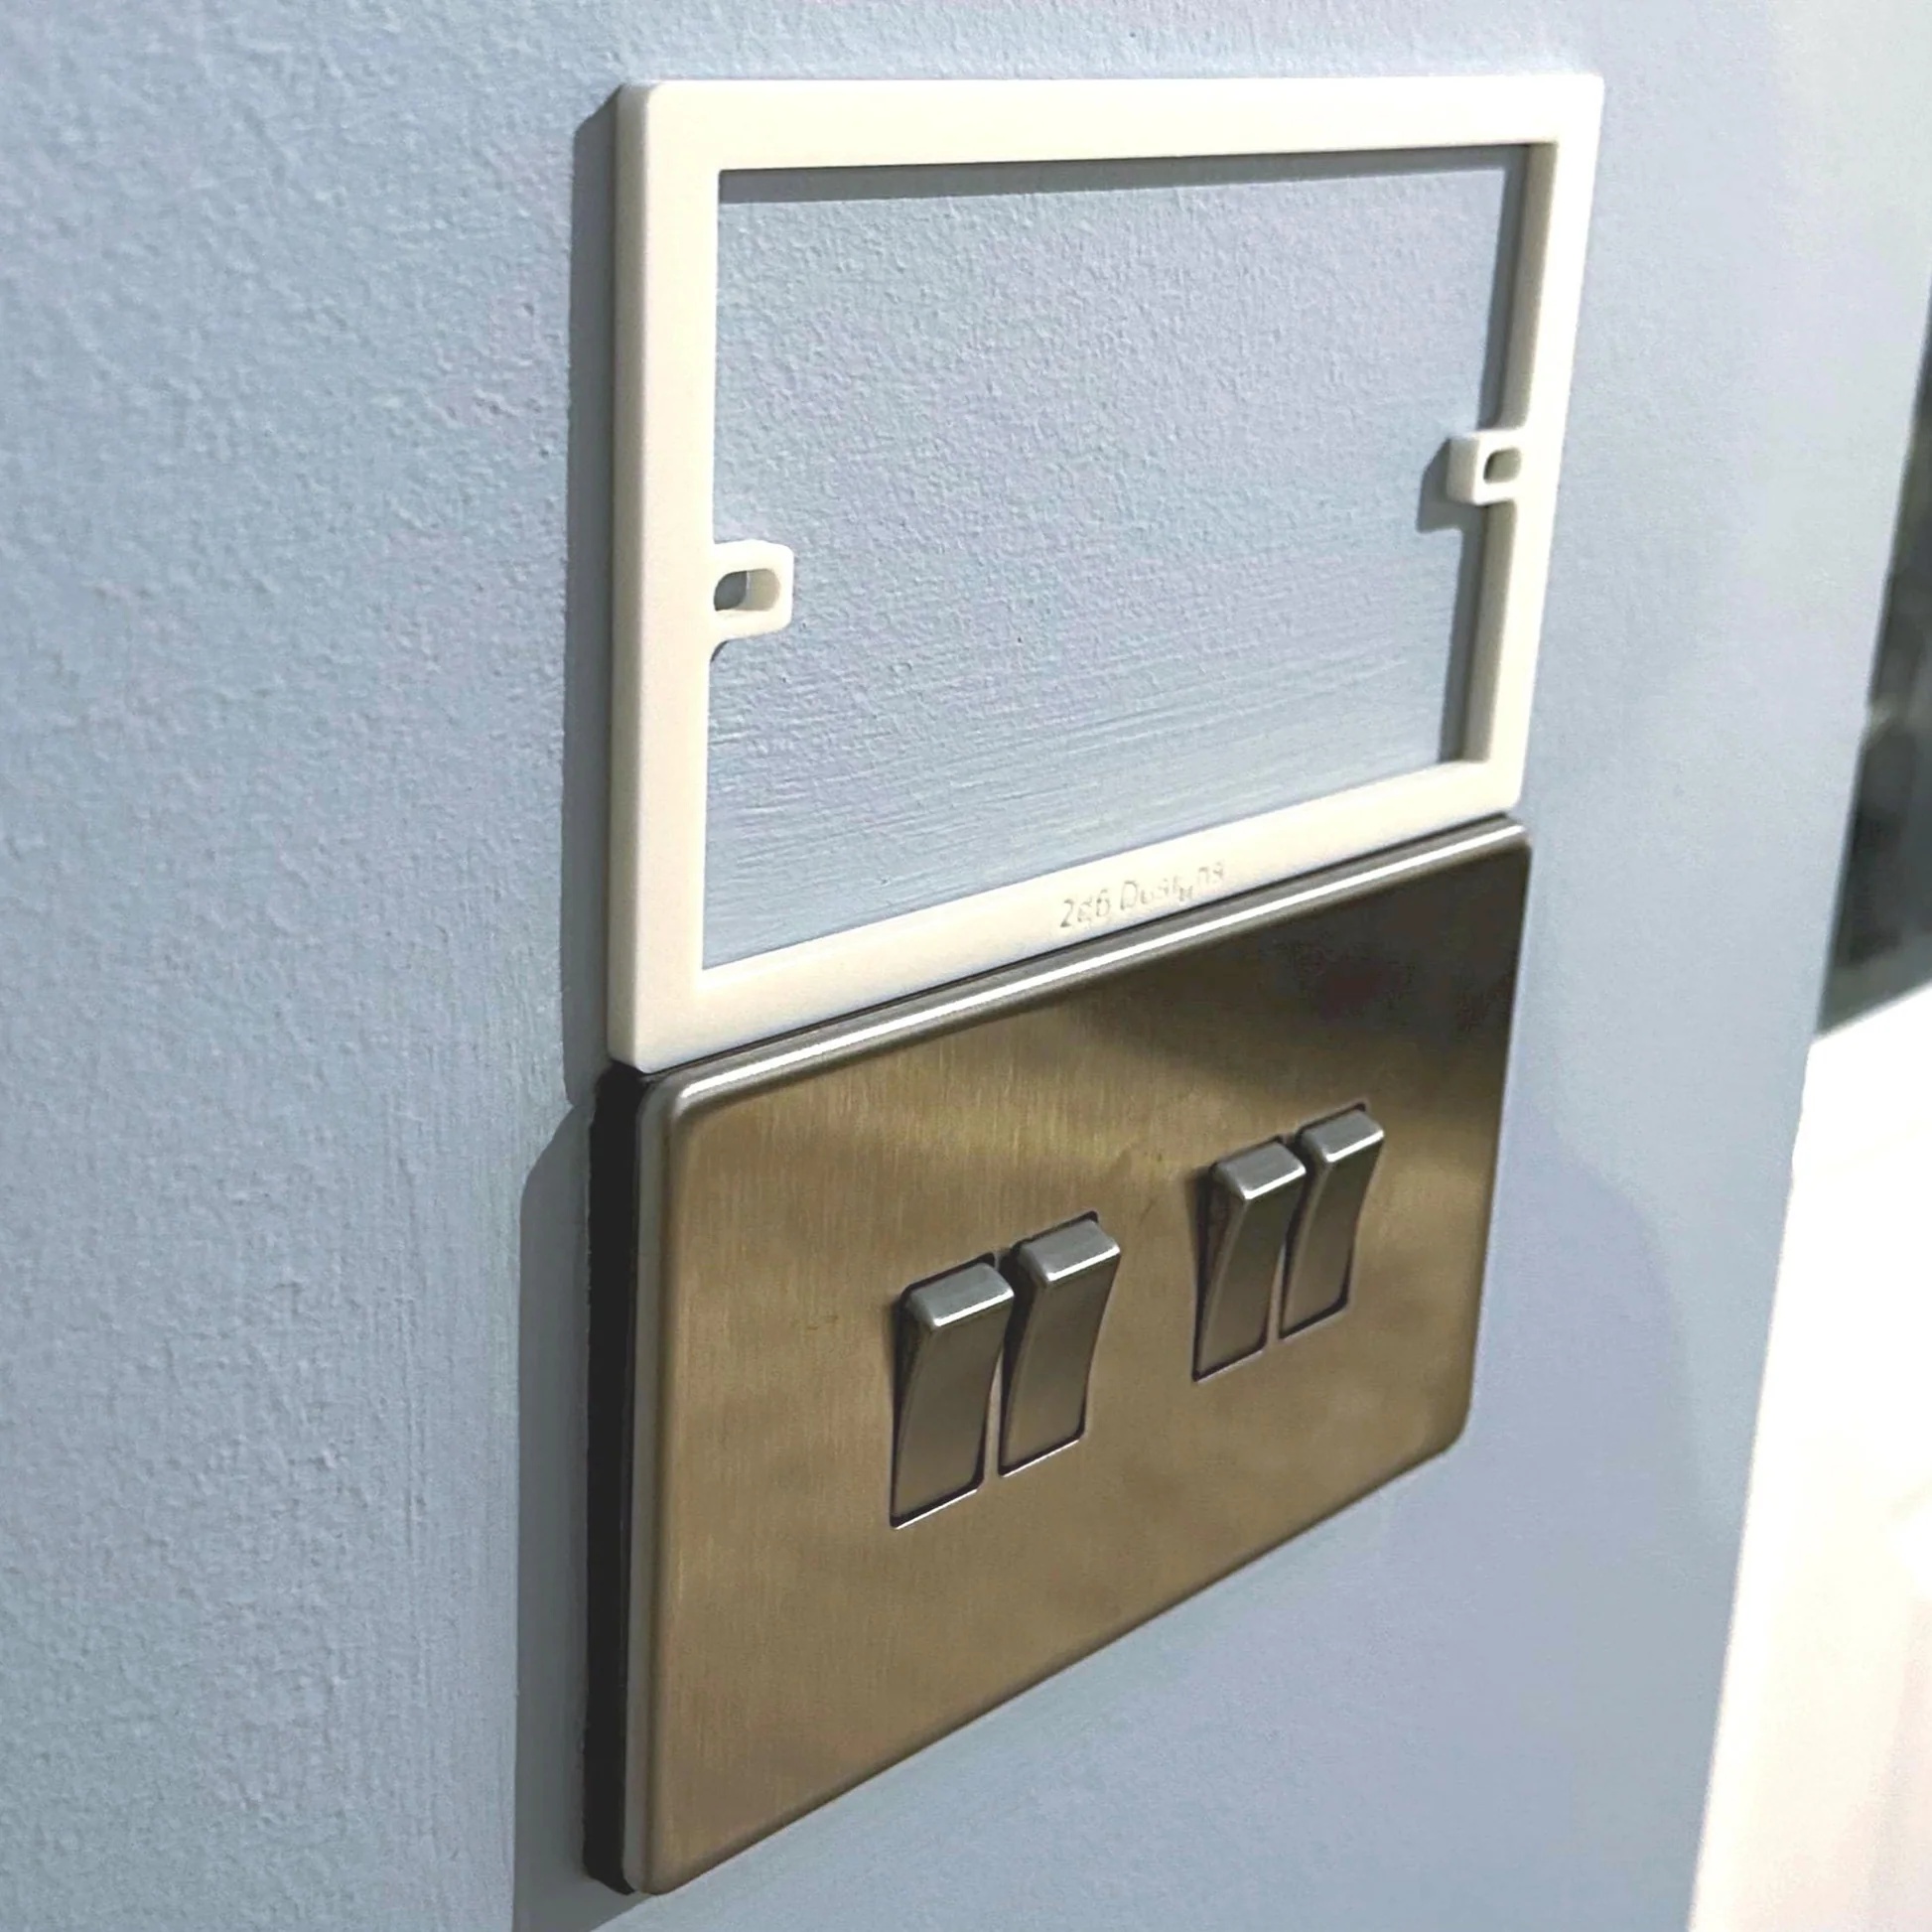
Understanding this distinction is the first step toward finding the right hardware. If your switch is too deep in the wall, a bespoke spacer plate is the professional solution. You can design one to your exact requirements using our Build My Spacer tool.
Reach Extenders vs Depth Spacers
Confusing these two types of extenders can lead to purchasing the wrong product and failing to solve your core problem. A quick comparison makes the difference clear.
-
Reach Extenders: These are accessibility tools. They are typically long plastic handles or oversized covers that attach over the existing light switch. Their sole function is to make the switch easier to reach or operate, often for children or people in wheelchairs. They do not alter the electrical installation itself.
-
Depth Spacers: These are structural electrical components. They are frames installed behind the light switch faceplate to compensate for a recessed backbox. Their purpose is purely technical: to ensure a safe, secure, and flush mounting on a wall that has been thickened by materials like tiles, wainscoting, or new drylining.
When your light switch is wobbly or sunken after a renovation, a reach extender will not help. You need a depth spacer to correct the installation geometry and provide a solid foundation for the switch.
When a Standard Extension is Not Enough
Once you identify the need for a depth spacer, you might find generic, off-the-shelf plastic extension frames or shims at a hardware store. While these can sometimes work for standard wall thicknesses, they often fall short in modern UK homes where renovation projects create non-standard gaps.
-
Limitations of Generic Frames: Off-the-shelf extenders come in fixed depths, such as 5mm or 10mm. If your gap is 8mm or 13mm, you are left with an imperfect fit. Stacking them is unstable and can create an unprofessional, gapped appearance.
-
The Need for Bespoke Manufacturing: Custom wall finishes rarely result in standard measurements. The thickness of a specific tile plus its adhesive, or the depth of decorative MDF panelling, requires a spacer manufactured to a precise, custom depth for a truly flush finish.
-
The Role of Custom Fit Spacers: A custom-fit light switch spacer plate is engineered to the exact millimetre depth you require. This bespoke approach eliminates gaps, prevents the faceplate from cracking under uneven pressure, and ensures the final result is perfectly integrated with your decor.
Common Scenarios Requiring a Light Switch Spacer Plate
Several common home improvement projects can leave your electrical backboxes recessed, making a spacer plate essential for a safe and professional finish. In each case, the new wall surface extends beyond the front edge of the pattress, preventing the switch faceplate from sitting flush.
-
Kitchen or Bathroom Tiling: After adding tiles and adhesive, the wall surface can be 10mm to 15mm thicker, leaving the original backbox deeply sunken.
-
Decorative Wall Panelling: Adding wainscoting or modern MDF panelling creates a significant gap that standard screws cannot bridge, requiring a deep extender.
-
Thick Plastering or Drylining: Skimming over old walls or adding a new layer of plasterboard can recess sockets and switches by several millimetres.
-
Smart Switch Upgrades: Many modern smart switches have bulky electronics that require extra wiring space. A spacer can create this needed room behind the faceplate, even if the backbox is not recessed.
Tiling and Kitchen Renovations
Tiling is one of the most common reasons for needing a light switch extender. The combined thickness of tile and adhesive almost always makes the original backbox inaccessible. Trying to install a switch without a spacer in this situation leads to serious problems.
-
The Recessed Backbox Problem: The lugs, or screw holes, inside the backbox are now too far from the new tile surface. The original screws are too short, and even longer screws will not solve the underlying issue.
-
The Danger of Floating Switches: Without a solid surface to tighten against, the switch "floats" in the opening. It will feel wobbly and unstable when used. This constant movement can strain the electrical wiring over time, creating a potential safety hazard.
-
Achieving a Professional Finish: A bespoke spacer fills the gap perfectly, creating a solid platform level with the tile. This allows the faceplate to be tightened securely, resulting in a stable, flush finish that complements your expensive tile work.
Wall Panelling and Decorative Finishes
Decorative panelling is a popular way to add character to a room, but it presents unique challenges for electrical fittings. The thickness of MDF or timber panels can create a deep recess around light switches.
-
Challenges with Panelled Walls: Unlike a flat plaster wall, panelling can be uneven or have decorative grooves. A generic shim or extender may not sit flat, leading to an unstable switch and an untidy appearance.
-
Why a Custom Spacer is Best: A custom depth light switch spacer is the ideal solution. It can be made to the exact thickness of your panelling, ensuring a perfect transition from the panel surface to the switch faceplate. This creates a clean, integrated look that appears intentional.
-
Further Guidance: For homeowners and installers working with this popular design feature, our detailed article offers more specific advice. Read The Complete Guide to Choosing a Socket Spacer for Panelled Walls for more detail.
Why Bespoke Spacers Outperform Generic Electrical Shims
When faced with a sunken switch, some may be tempted to use DIY workarounds like stacking washers or trimming generic plastic shims. While these methods might seem like a quick fix, they fall far short of the quality, safety, and aesthetic provided by a bespoke spacer plate. A custom-manufactured extender is not just a piece of plastic; it is an engineered component designed for a perfect fit.
-
Aesthetic Superiority: A single, continuous frame in a matching colour looks infinitely better than a stack of mismatched washers or roughly cut shims visible at the sides of the faceplate.
-
Enhanced Structural Stability: A bespoke spacer provides a solid, flat, and continuous mounting surface. This prevents the switch from wobbling during daily use and protects the wiring from strain.
-
Compliance and Safety: By creating a secure and stable platform, a properly fitted spacer ensures the installation meets high safety standards. It prevents the faceplate from cracking and ensures no undue stress is placed on the electrical connections.
-
Precision Manufacturing: Bespoke spacers are made to your exact measurements. This eliminates the need for time-consuming and often inaccurate trimming of generic parts on-site, guaranteeing a perfect fit every time.
The Problem with DIY Workarounds
Using improper hardware to solve a depth issue can create more problems than it solves. Makeshift solutions are often a false economy, leading to an unsatisfactory finish and potential safety risks.
-
The Wobbly Switch Issue: Stacking rubber washers or small plastic shims rarely creates a perfectly even surface. When you tighten the faceplate screws, the switch will rock on these high points, leading to a perpetually wobbly fitting.
-
Risk of a Cracked Faceplate: Tightening screws against an uneven or gapped surface puts immense stress on the faceplate, which is often made from brittle plastic or metal. This can easily cause it to crack or deform.
-
Eliminating the "Making Do" Mentality: A bespoke spacer is the correct part for the job. It removes the need for guesswork and improvisation, allowing you to complete the work to a professional standard with confidence.
Bespoke Quality and Material Benefits
The decision to use a custom-fit spacer is a choice for quality and precision. Professional electricians working on high-end residential projects prefer bespoke components because they guarantee a flawless result that reflects the quality of their work.
-
A Seamless, Integrated Look: Custom-fit socket spacers can be colour matched to your faceplate or wall decor, making them blend in seamlessly. The result is an installation that looks clean, deliberate, and professionally finished.
-
The Professional's Choice: Electricians value efficiency and reliability. A bespoke frame that fits perfectly the first time saves time on site and prevents client callbacks for wobbly switches or poor finishes.
-
Technical Specifications: For those interested in the material science and manufacturing precision behind our products, we offer a more detailed exploration. Learn more in our expert guide to precision electrical finishes.

How to Measure for Your Custom Light Switch Extension Frame
Ordering a bespoke light switch extender is simple, but it starts with one crucial step: accurate measurement. Taking a moment to measure the gap correctly ensures the custom spacer you receive will fit perfectly. The goal is to measure the distance from the front edge of the sunken backbox to the face of the new wall surface.
-
Measure the Gap: You need to determine the exact distance from the screw lugs inside the backbox to the finished wall surface. This measurement will be the required depth of your spacer.
-
Identify the Gang Type: Count how many switches are on the plate. A single switch is a one-gang, two switches is a two-gang, and so on. You will need to select the correct gang type for your extension.
-
Check for Obstructions: Ensure there is enough clearance around the switch faceplate. The spacer will have the same footprint as the plate, so check that it will not overlap with any nearby trim, tiles, or door frames.
-
Use a Customisation Tool: Once you have your measurements, you can input them directly into a configuration tool to order the precise part you need.
The Step-by-Step Measurement Process
You do not need specialised tools to get an accurate measurement. A simple ruler and a straight edge are usually sufficient.
-
Safety First: Before you begin, turn off the power to the light switch at your consumer unit (fuse box). Use a voltage tester to confirm there is no power to the switch.
-
Remove the Faceplate: Unscrew the two faceplate screws and gently pull the switch away from the wall. Let it hang carefully by its wires.
-
Measure the Depth: Place a straight edge (like a ruler or spirit level) across the opening, resting on the finished wall surface. Then, use another ruler or a depth gauge to measure the distance from the back of the straight edge to the front-facing screw lug on the electrical backbox.
-
Check for Consistency: Measure the depth at both the top and bottom screw lugs. Walls, especially after plastering or tiling, are not always perfectly flat. If you get different measurements, use the larger of the two to ensure the spacer will fully cover the gap. This final number is the depth you need for your custom spacer.
Using the Build My Spacer Configurator
Once you have your measurements, creating your custom light switch extender is easy. Our online tool guides you through the process, allowing you to specify every detail for a perfect component.
-
Introducing the Configurator: The Build My Spacer tool is designed for instant customisation. It removes the guesswork and allows you to order a spacer manufactured to your exact needs.
-
Select Your Specifications: In the tool, you will select the gang type (single, double, etc.), enter the precise depth you measured (in millimetres), and choose a colour that best matches your switch plate or decor.
-
Live Preview: As you input your dimensions, the tool provides a live preview of your custom extension frame. This allows you to visualise the final product and confirm that all specifications are correct before you order.
Achieving a Professional Finish with SocketSpacers.com
A sunken light switch can be a source of daily frustration, undermining the look of an otherwise beautiful room. A bespoke spacer transforms this common DIY problem into a subtle design feature, ensuring your electrical fittings look as good as the rest of your home. The key is a flush, secure, and perfectly integrated installation.
-
From Flaw to Feature: A custom-fit spacer makes the light switch look intentional and well-planned, rather than like an afterthought.
-
The Importance of Colour Matching: The ability to choose a colour that complements your faceplate or wall is essential for a high-end finish. It ensures the extender blends in, becoming an invisible part of the installation.
-
Longevity and Durability: A flush finish is not just about aesthetics. By ensuring the switch is securely mounted, a spacer prevents movement that can damage the faceplate or wiring over time, contributing to the longevity of the fitting.
-
Simple and Safe Installation: With the right custom part, completing the job safely is straightforward. The final step is fitting your made-to-order spacer and enjoying a perfect result.
Ordering and Delivery
We have streamlined the process of ordering bespoke parts to be as simple and efficient as possible. From measurement to installation, our system is designed to provide you with the exact component you need without hassle.
-
The Bespoke Ordering Process: Using the Build My Spacer tool on SocketSpacers.com, you can configure and order your custom part in minutes. Simply enter your dimensions and choose your options.
-
Made-to-Order for You: When your order is placed, we manufacture the spacer to your exact specifications here in the UK. It will arrive ready to install, with no on-site modification needed.
-
See Real-World Results: Our customers, including professional electricians and discerning homeowners, consistently achieve outstanding results. You can see examples of their finished projects by visiting our reviews page.
Safety and Final Checks
Installing your new spacer is a simple task, but it is crucial to follow safety procedures. Electrical work, no matter how minor it seems, should always be done with caution.
-
Isolate the Power: Before you loosen any screws, always ensure the power to the circuit is turned off at the consumer unit. Double-check with a voltage tester.
-
Use Longer Screws: When you add a spacer, the original faceplate screws will be too short. You will need longer screws (typically M3.5 electrical screws) that are equal to the original length plus the depth of your spacer.
-
The Satisfaction of a Perfect Fit: With the power off, simply place the spacer over the backbox, place the switch on top, and use your new, longer screws to fasten everything securely. The result is a perfectly aligned, solid, and professional light switch installation that will stand the test of time.
Frequently Asked Questions (FAQs)
Can I use a light switch extender on a tiled wall?
Yes, absolutely. This is one of the most common and ideal applications for a light switch extender, or more accurately, a spacer plate. After tiling, the electrical backbox is often recessed by 10mm or more. A custom-depth spacer is made to fill this specific gap, providing a solid, flush surface for the light switch to be mounted securely against the tiles.
Do I need a qualified electrician to fit a spacer plate?
While fitting a spacer plate is a relatively simple task, UK safety regulations recommend that any work on electrical circuits is carried out by a qualified and competent person. If you are not confident in isolating the power and handling electrical wiring, it is always best to hire a professional electrician.
What is the difference between a socket spacer and an extension frame?
In practice, the terms are often used interchangeably. Both refer to a frame used to bring a socket or switch faceplate forward to sit flush with a new wall surface. "Spacer" or "spacer plate" is a common term, while "extension frame" often implies a larger or deeper component, but their function is identical: to solve depth issues with recessed backboxes.
How do I fix a light switch that is too deep in the wall after plastering?
The best way to fix a light switch that is too deep after plastering is to use a bespoke spacer plate. First, measure the distance from the front of the plaster to the screw lugs on the backbox. Then, order a spacer of that exact depth. This will fill the gap, allowing you to use longer M3.5 screws to securely fasten the switch for a professional, flush finish.
Are custom light switch spacers available for multi-gang switches?
Yes, custom spacers are available for virtually any configuration, including single (one-gang), double (two-gang), and larger multi-gang switch plates. Bespoke manufacturing means you can specify the exact size and depth needed for any standard UK light switch arrangement.
What length of screws do I need when using a 10mm spacer?
You will need screws that are 10mm longer than the original ones. Standard light switch screws are often 25mm long. If you add a 10mm spacer, you would typically need screws that are at least 35mm long to ensure a secure fixing into the backbox. It is always best to have screws that are slightly longer, such as 40mm, to be safe.
Is it possible to colour match a light switch extender to my decor?
Yes, bespoke light switch extenders are often available in a range of colours, such as white, black, and grey, to match the most common faceplate finishes. This allows the spacer to blend in seamlessly with the switch or the surrounding wall for a clean and professional appearance.
Why is my light switch wobbly after I tiled the kitchen?
Your light switch is wobbly because the backbox is now recessed behind the tiles, and the screws are not able to pull the switch faceplate tight against a solid surface. The switch is effectively "floating" in the opening. To fix this, you need a spacer plate that matches the depth of your tiles and adhesive, which will provide the solid mounting surface required for a stable installation.
Electrical Safety
Always isolate the circuit and confirm it is dead before removing a socket or switch faceplate. Only carry out the work if you are competent to do so. If you find damaged wiring, signs of overheating or anything unsafe, stop and contact a qualified electrician.